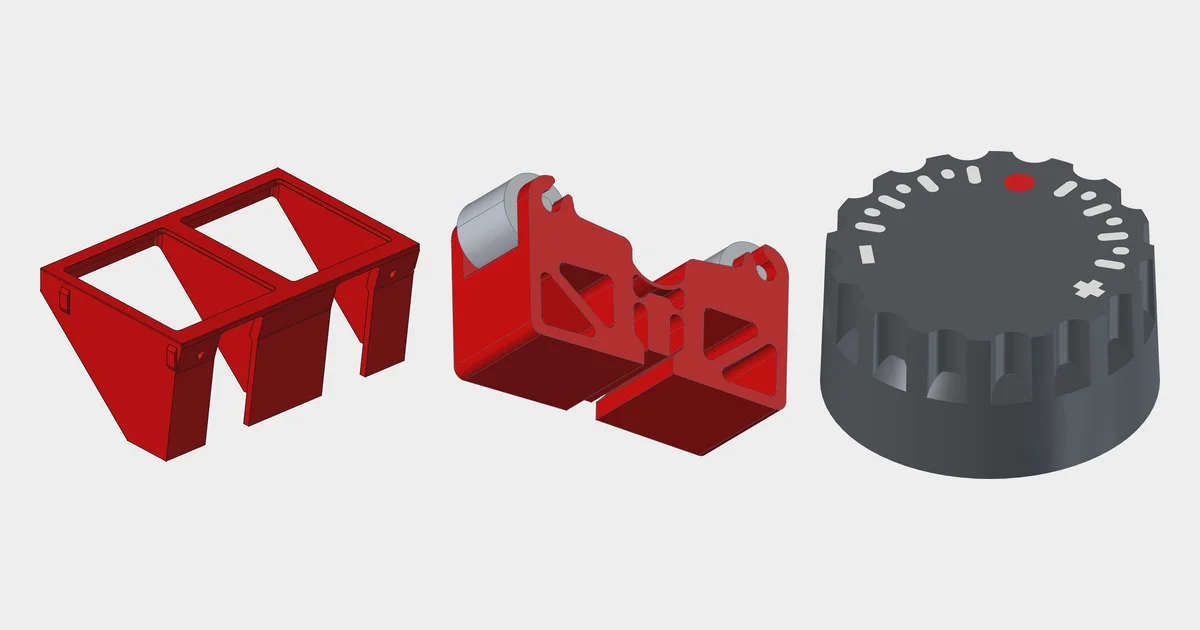
The JOBO CPE2 and CPE2+ are still among the most common rotary processors in home darkrooms, but they are decades old, and the small plastic parts go first: the bottle frame cracks, drum rollers and their holders go missing, knobs break or simply disappear. Original spares are hard to find, and when one does turn up, it usually costs far more than a small piece of plastic should.
So I designed printable replacements and upgrades for my own CPE2 and collected them in one open repository:
| Part | What it does |
|---|---|
| Bottle hanger | Holds JOBO bottles in the CPE2 water bath; screws to the tank wall |
| Drum supports | Roller supports for the far end of the drum — stands for the bath rib and supports for the JOBO lift rods (1500, 2500 and Expert drums) |
| Control knob | Replacement Ø 33 mm knob for the CPE2 / CPE2+, with multicolour markings or laser-engraving files |
Every part is a parametric FreeCAD model with STEP files and printing notes, and every part that carries load was strength-checked with FEM. The files are free on GitHub under a non-commercial share-alike license.
The new bottle storage and the drum supports in use:
Bottle hanger for the CPE2 water bath
The original bottle frame is the part that suffers most. Mine was damaged and awkward to fit, which also made bottle positions hard to repeat during the CPE2 temperature measurements. The replacement is a modular hanger that screws firmly to the tank wall.
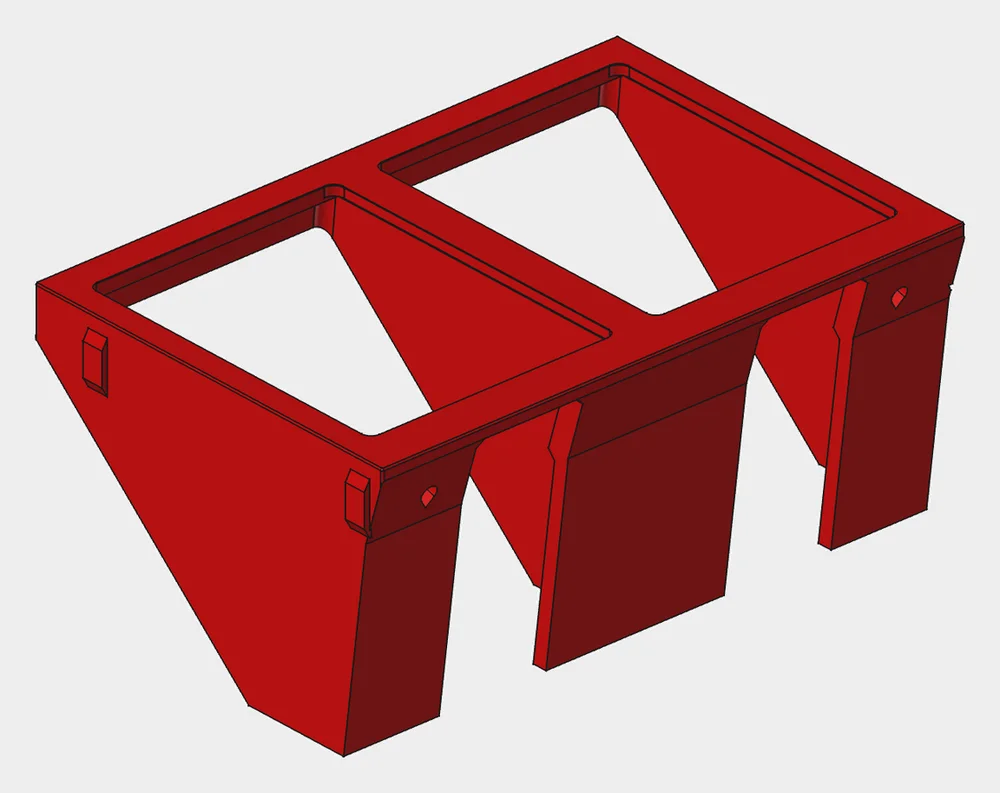
One module is 110 mm deep from the tank wall to the front edge and holds two bottles; changing one parameter gives three or four.
- Bottles can’t float away. Each bottle drops through a 90 × 70 mm window (1.5 mm clearance around an 87 × 67 mm bottle). A small bump on the bottle catches under the front lip, so even an empty bottle stays put.
- It follows the real tank wall. The CPE2 tank wall kinks 17 mm below the rim; the mounting wall of the hanger copies both slopes, so it sits flat against the tank.
- Gussets between the bottle sections carry the load from the frame into the wall.
- Modules click together. Two hidden press-fit tabs on one end fit sockets on the next module. They sit under the top panel, so nothing shows from above, and the joint prints without overhangs or bridges.
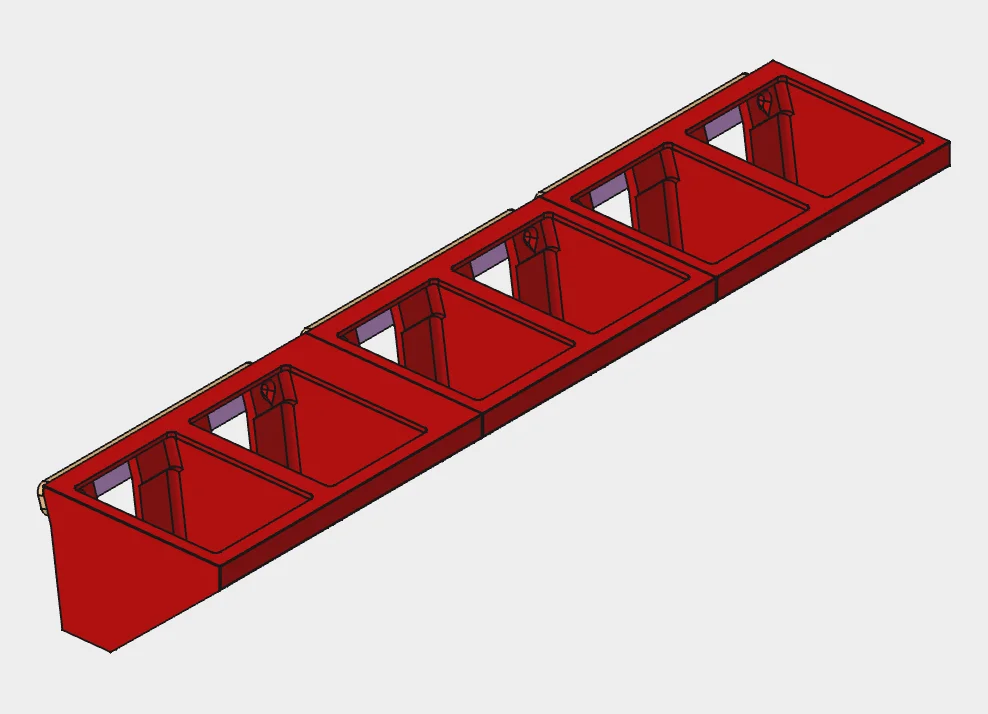
A full row in the tank
The tank is filled with two-bottle modules — each fits a 256 mm print bed easily: two standard modules plus one spacer module, which is 20 mm longer and closes the remaining gap.
Mounting
Each module is held by four countersunk M4 screws. They go through the 6 mm hanger wall and the 1 mm tank wall into M4 nuts held in a printed backplate on the outside of the tank. A 1 mm TPU gasket between the tank and the backplate has holes slightly smaller than the screws, so it closes around them and keeps the bath water in.
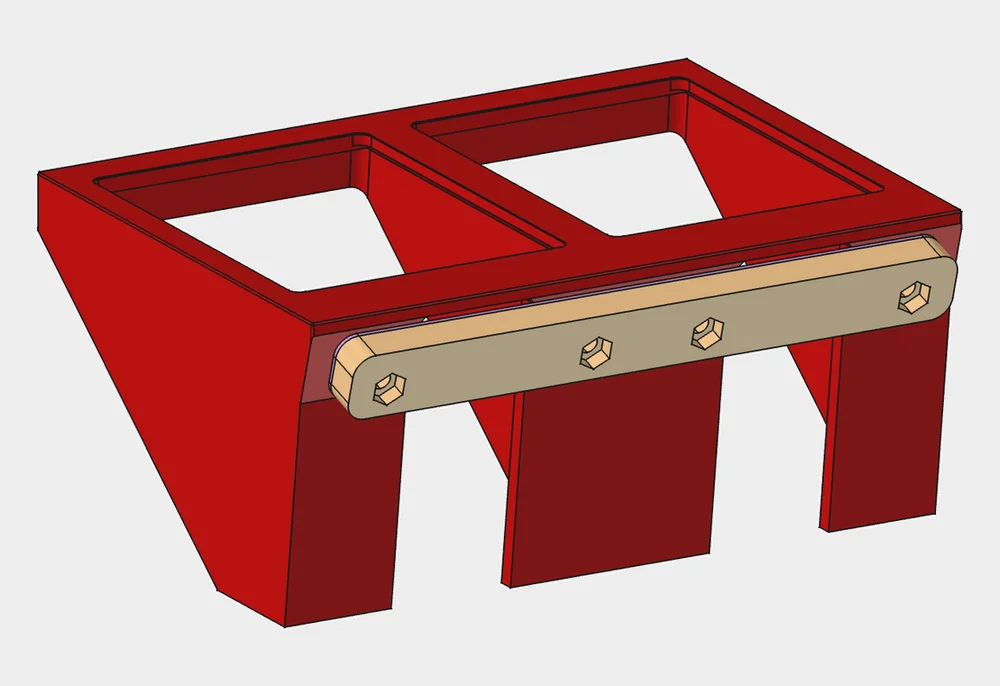
Per module you need: 4 × M4 × 16 countersunk screws (ISO 10642 or ISO 14581, head Ø ≤ 9 mm), 4 × M4 nuts, one backplate and one gasket.
- Put the nuts into the backplate pockets.
- Hold the gasket and the backplate against the outside of the tank.
- Insert the screws from the bottle side and tighten gently — the gasket only needs to be compressed, and PETG creeps under high pressure.
Printing the hanger
| Part | Qty | Time / mass (PETG, Bambu Lab A1) |
|---|---|---|
| Standard module (2 bottles) | 2 | ≈ 3 h 25 min, 133 g |
| Spacer module | 1 | ≈ 4 h 06 min, 178 g |
| Backplate | 1 per module | ≈ 45 min, 24 g |
| Gasket, TPU 95A | 1 per module | ≈ 26 min, 3 g |
Hangers print frame face down without supports. Profile: 0.2 mm layers, 5 walls, 100 % infill, PETG or ABS.
Hanger strength
FEM (CalculiX) of one two-bottle module on its four screws, with a layered-PETG failure criterion derated for the warm bath:
| Case | Load / allowable (≤ 1 passes) |
|---|---|
| Empty bottles trying to float (sustained, safety factor 4) | 0.37 ✅ |
| Full 0.7 kg bottle knocked onto the front edge at 0.5 m/s (safety factor 2) | 1.11 — uses part of the safety margin, still below the material strength |
With only the two outer screws, the same knock reached 4.3, so use all four.
Drum supports
Printed roller supports that carry the far end of a JOBO drum. Two families:
- Stands clip onto the 10 × 5 mm rib in the CPE2 water bath. No screws, no tools — and you can slide a stand along the rib to suit the length of your drum.
- Lift supports sit on the two Ø 9.7 mm rods of the JOBO lift and carry the drum when it is raised. Version A slides on with closed collars, version B snaps on from above.
All of them use the original JOBO rollers (Ø 20 × 20 mm, Ø 4.8 mm pins), which snap into the cheeks from above.
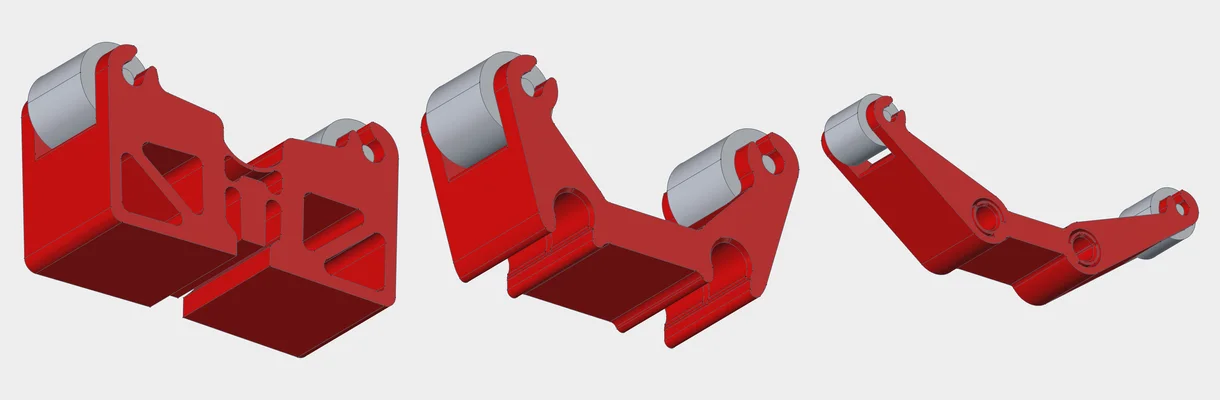
| Part | Drums | Mount |
|---|---|---|
| Stand 1500 | 1500 series, Ø 95 mm | clips onto the bath rib |
| Stand 2840 | 2800 series, Ø 137 mm | clips onto the bath rib |
| Lift 1500 A / B | 1500 series | lift rods |
| Lift 2500 A / B | 2500 series, Ø 137 mm | lift rods |
| Lift Expert A / B | Expert drums, Ø 206.9 mm, on the upper coupling | lift rods |
How the stands grip
The stand is a compliant “pliers” with a flexure hinge on each side. Its halves are modelled turned slightly inwards, so the jaws print a little closed; pushed onto the rib, they spread and grip both sides. The weight of the drum presses the rollers down and out, and the arms turn that into extra jaw pressure.
The clamp is tuned to a 10.0 mm rib — if it grips too hard or too softly, measure yours.
Printing the supports
Print in PETG or ABS. Each support takes about 1.5–2.5 hours and 30–60 g (PETG, Bambu Lab A1). The roller slots sit in the middle of the part’s thickness, so either print with supports in the slots or cut the part in half in the slicer — with dowel connectors kept away from the spring, hinges and jaws — and glue the halves. Settings: 0.2 mm layers, 4 walls, 25–30 % gyroid, 100 % scale (the spring and hinges are tuned to the printed size).
Support strength
The FEM puts the whole full drum on one support — twice what a support carries when the drum rests on two. Assumed full drums: 1500 → 1 kg, 2500 → 2 kg, Expert → 3 kg.
- Stands and the 1500 / 2500 lift supports stay at 0.08–0.19 of the allowable load.
- Lift Expert B reaches 0.48; Lift Expert A reaches 1.13 with the whole drum on one support and passes (≈ 0.57) once the drum is shared by two supports, as in normal use.
- While a stand is clamped on the rib, its spring works at about three quarters of the material strength, so it will relax over time in warm water. Take the stands off the rib when you are not developing.
Replacement control knob
A replacement knob for the CPE2 / CPE2+ (Ø 33 × 16 mm, 16 grip flutes), with three faces on the same body:
- Temperature scale — a red zero dot, long and short ticks and − / + at the ends
- Positions — a red dot with “1” and “2”
- Pointer — a single indicator line

The markings are one-layer colour inserts, set up as separate parts in the STEP files, so on a multicolour printer (Bambu Studio, OrcaSlicer) they come out inlaid rather than painted on. Printing in one colour? Use the blank knob and laser-engrave the markings from the DXF / SVG files instead.
A steel spring holds it. The hub is split and has a D-shaped bore. A standard 15 mm internal circlip (DIN 472-15) snaps into a groove around the hub and clamps it onto the shaft — a snug fit without glue, and the knob can still be pulled off.
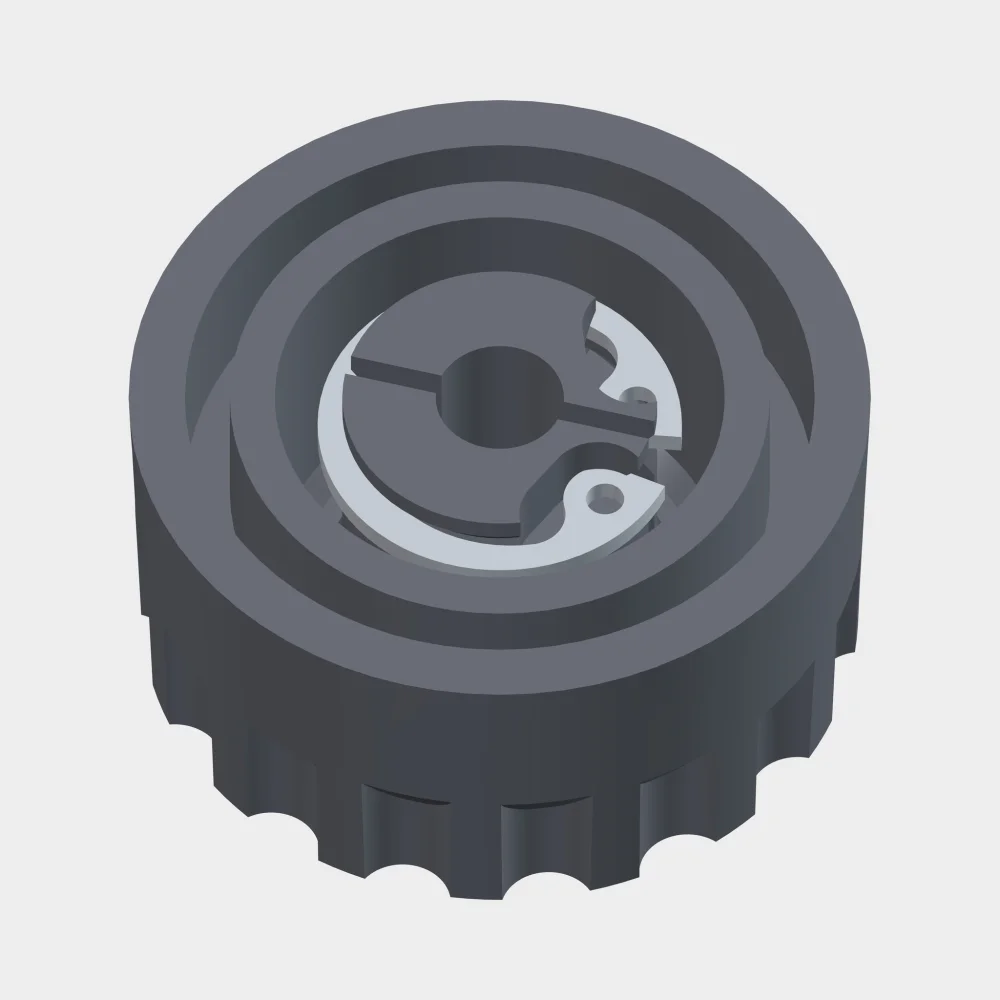
Print it upside down, top face on the plate, without supports. Use a 0.2 mm first layer (the inserts are exactly one layer thick), 3–4 walls and 25–40 % gyroid, in PETG or ASA.
Watch the knob short on YouTube. The knob pack with step-by-step slicer instructions is also on Ko-fi.
Materials and files
- Material: PETG, ABS or ASA for anything that goes near the water bath. PLA softens and creeps at 38–40 °C.
- Models: FreeCAD 1.x, driven by parameter spreadsheets — change a value and recompute. The STEP files open in any CAD program or slicer.
- Strength checks: Gmsh + CalculiX with a layered-PETG criterion; the scripts and results are in the repository next to each part.
- License: CC BY-NC-SA 4.0 — share and adapt with attribution, not for commercial use, under the same license.
Not affiliated with JOBO.
JOBO CPE2+ video series
Everything I have filmed about my CPE2+ — setup, modifications, motor repairs and temperature tests — is collected in one YouTube playlist:
- Jobo CPE2+/CPE3 system and Jobo 1500 drums — development machine for the colour darkroom (2022)
- Wet station with Jobo CPE2+ for the darkroom (2022)
- Jobo CPE2+ mod with temperature regulator and C-41 film development (2022)
- Jobo CPE2+ motor repair and pump mod (2022)
- Jobo CPE2+ mod V2.0 — temperature control and mixing (2022)
- C-41 temperature stability in the Jobo CPE system: circulators, methods and more (2023)
- Film developing tanks compared: cheap vs Paterson vs Jobo (and modern alternatives) (2025)
- You bought a Jobo CPE2 and don’t know where to start (2026)
- Temperature stability in the Jobo CPE2 (2026)
- Learning from my mistakes: fixing the Jobo CPE2 motor and other stuff (2026)
- New bottle storage and drum support for the Jobo CPE2 (2026)